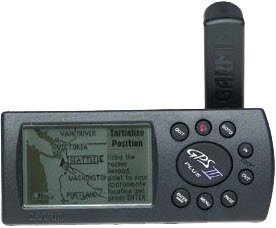
 The Garmin GPS III Plus was pretty high-end for a personal GPS in 1999. In July of that year, this baby set me back a whopping $355. Some rather detailed maps could be downloaded to it and it could tell you where things were relative to where you were but it couldn’t tell you how to get there. I’m fairly certain that there was a GPS IV that offered routing but I can find nothing online about it. Today’s web claims that the earliest GPS of this style that did routing was the GPS V. The GPS V was described as a “versatile navigator”. The III Plus merely had “cartographic capabilities”. I always thought of it as an automatically scrolling map.
I added a cable that allowed me to simultaneously connect it to the car’s 12 VDC cigarette lighter and to a computer’s RS-232 port. It was another one of those “computer in the car” things that rarely got used. I used the 12 VDC power almost constantly and I used the computer connection frequently but seldom at the same time. The frequent use of the computer connection was because the unit really wouldn’t hold much more than a day’s worth of maps and my end of day tasks often included refreshing the maps in the Garmin. Throw in a little expressway travel and it was entirely possible to “over drive” the loaded maps in a day. I did not buy an optional mount for the unit and got by quite nicely with a bit of velcro on the console.
You could select cities and other points of interest and the III Plus would point toward them and tell you how far away they were. If you chose one to “Go To” it would continuously report the remaining distance and time. Since the distance was “as the crow flies”, it and the time to go were only meaningful if the road between here and there was a straight one. I’m not really sure what it used to calculate that time to go; A rolling average speed is my guess. You could string together multiple way-points in what the III Plus called routes and it would provide total distance and time numbers based on straight lines between the way-points. This was essentially a fancy hiker’s handheld unit with the aforementioned “cartographic capabilities”.
The GPS III Plus led me to a style of navigating I called “jagging”. When I wasn’t following a specific route, like Historic Route 66, I would plug in a destination then head toward it. At each intersection, I’d make the decision of which way to go based on the direction of the destination from that point. You might think that would result in the shortest path but real roads are neither particularly straight or aligned squarely with others. “Jagging” put me on some interesting roads I might never have traveled otherwise.
My Gear – Chapter 2 — Toshiba Libretto
The three items at the heart of my road trip tool kit are a digital camera, a portable computer, and a GPS receiver. My first such set, the one used on that 1999 Route 66 road trip, consisted of this Garmin receiver along with the Agfa camera and Toshiba sub-notebook described earlier. Future purchases would be upgrades or replacements.
The blog post about the 100th trip pointed to a collage of 100 thumbnails representing them all. Just looking at that collage would bring a smile to my face for the first dozen times or so. But then I got questions about what the subjects were or what trip they represented. I knew all the answers but I quickly realized that the collage could really be improved. When an individual image appears on the home page, the subject and the trip it is from are identified beneath it. Clicking on the picture goes to the associated trip report. I decided that it would be cool if the collage did the same thing so now it does. Hovering over a section of the collage will reveal trip number and name and the identity of the subject. Clicking will take you to the trip report. Try it out here.

Pingback: Taking A Look At A Route 66 Road Trip « Can You Be Sure….
Pingback: My Apps – Chapter 3Garmin MapSource | Denny G's Road Trips Blog