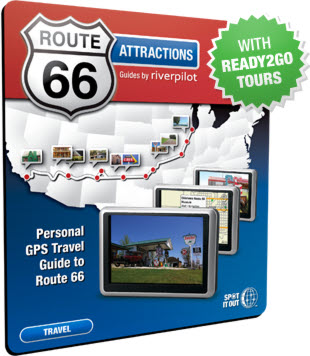
 My relationship with Garmin GPS receivers goes back to my first documented road trip in 1999. I haven’t owned a lot of different models and I’m definitely no expert but I’ve used and liked Garmin products for quite awhile. Then, as I traveled with a new unit I bought last April, I began to think that Garmin had completely abandoned me. It took several email exchanges with a fellow named River Pilot to convince me that Garmin still makes products capable of following turn-by-turn routes. Garmin, however, insists on aiming those products at motorcycles. I drive a car.
River Pilot doesn’t work for Garmin. He owns River Pilot Tours, a company offering, among other thing, motorcycle tours of Route 66. They developed the subject of this review. Since River was so helpful in explaining the, in my opinion, warped Garmin product line, I really wanted to like his product but feared I wouldn’t.
I crept up on it. An important thing I learned from River is that there are at least two different types of software inside Garmin GPS units. That inside zūmo®s handles turn-by-turn routing properly; That inside nüvi®s (and other models) does not. By “properly”, I mean the device will not only guide you from point A to point B but will do it along a specific pre-plotted path. The unit I got in April was a nüvi®. I recently bought a zūmo® 220. After a few experiments in the neighborhood, I used it on a trip to Florida and convinced myself that it would indeed follow my routes. Then I bought Route 66 Attractions with Ready2Go Tours.
There are two different River Pilot Tours products available to mate up with the two types of Garmin products. Route 66 Attractions contains more than 800 points of interest (POIs) along Historic Route 66. Each has a description, a photo, and contact information. Almost any current Garmin street product is capable of guiding you to any of the attractions. Then, just as the name implies, Route 66 Attractions with Ready2Go Tours adds turn-by-turn instructions for both east and westbound tours of the route. Both products are published by SpotItOut and both are available for purchase and download at their website. Prices are $30 “with” and $10 “without” although the “with” version is currently on sale for $25.
UPDATE 4-JAN-2014: SpotItOut ceased operation sometime back and River Pilot Tours now sells its products directly on SD cards. The “regular” Route 66 GPS Attractions Guide can be purchased through the online store but the version with Ready2Go Tours cannot. Because not all Garmin GPS units are capable of running the turn-by-turn software, River Pilot Tours requests that potential Ready2Go Tours customers call (307 222 6347) or email (tours@riverspilot.com) so that compatibility can be determined before money is spent.
UPDATE 6-JUL-2014: Both versions of the Route 66 GPS Attractions Guide can now be purchased through the online store. If there is any doubt about compatibility or if there are other questions, just call (307 222 6347) or email (tours@riverspilot.com) for some friendly help. To remove any question of compatibility and avoid the purchase of a high end GPS for one time use, a pre-loaded unit can be rented from River Pilot Tours. Call or email for details.
Purchase, download, and installation were straight forward. The addition to my GPS looked good throughout a bit of playing but it’s really tough to judge a product’s Route 66 turn-by-turn capabilities in a living room in Cincinnati. Last Saturday’s cruise in Illinois provided an opportunity to get a better look.
I was purely a follower on the cruise which meant no one was depending on me and I wasn’t depending on the GPS. At our starting point in Mitchell, I selected the Illinois eastbound tour. I was given a chance to preview the route on a map or read a brief description. When I pressed “GO”, the unit spent a few moments calculating then asked if I would “like to navigate to the start of the Custom Route”. When I pressed “No”, it sat there quietly with a magenta line showing the route on the screen.
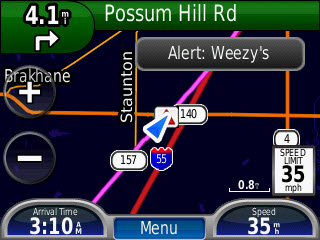 As we cruised northeast through Edwardsville and Hamel, the voice from the GPS essentially described the actions of the cars in front of me. It allowed me to anticipate turns just a bit so I might have even looked like I knew where I was going. The unit beeped when we approached Sixty-Six attractions such as Weezy’s and Decamp Junction. Each of these was identified and I could have pulled up a description if I’d wanted.
Things were going along swimmingly when the caravan made a turn to the right and the voice in the box said nothing. Was this a flaw in the GPS guided tour? Nope. Not at all. It was just a simple fact of life and roads. Over time roads get rerouted and from just south of Staunton to inside the city of Springfield US 66 had two major alignments. The caravan turned right on the newer, post-1930, alignment while the GPS tour continued on the older, 1926-1930, alignment.
The primary purpose of the Ready2Go tour is to guide a traveler from one end of Route 66 to the other. It does just that and it keeps the traveler on some alignment of Route 66 all the way. It will not take you over every mile of every alignment that the route ever followed. For that you will need some maps, some books, perhaps some input from an expert, and a readiness to backtrack and explore. River Pilot Tours had to select one of the two Staunton-Springfield alignments to be part of the “grand tour” and they chose wisely. The older alignment is the more interesting of the two and we would be returning on it later in the day. We chose to do the newer one first purely for timing reasons.
I’m fairly confident that River Pilot Tours also chose wisely in the many other instances of multiple alignments. They operate their own guided tours and they know quite a bit about others. They also consult with some of the route’s best authorities. All of this helps select the route that goes, as River says, “where folks are actually driving”.
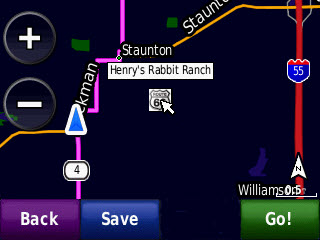 But the Ready2Go Tour doesn’t just ignore alternate alignments. For one thing, it is built on top of that extensive database of Route 66 attractions and not all those attractions are right along the tour path. At any time a traveler can push “Where To?” to see what attractions are near by. Click here for a screen shot of the list of attractions near the point where the alignments separate south of Staunton. Some, including Henry’s Rabbit Ranch, are not on the tour route. Selecting an attraction accesses an overview of a drive there. A description is also available and the location of the attraction can be seen on a map as pictured above. Note the tour route in magenta and the blue triangle showing current position. Even without those maps and books, a traveler can visit an “off route” attraction then head back to continue the tour.
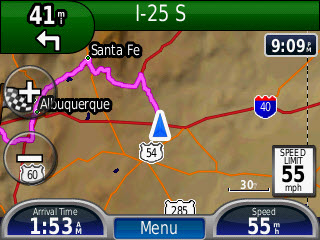 One alternate alignment actually appears in the product today. The pre-1937 alignment that passed through Santa Fe, New Mexico, can be selected and followed just like the main tour route through the state. In the future, other major alternates, such as the one between Staunton and Springfield, will be added.
Without detailing every turn, I can say that the Ready2Go Tour seemed to follow its chosen alignment quite well. In general, after we reached Springfield and started down the 1926-1930 route, the voice in the box and the car in front of me were in agreement. Exceptions were when the caravan occasionally headed off on some obscure and possibly dead-ended section. But then the caravan did have books, maps, and experts and a readiness to get lost explore. Both the path and the location of attractions presented by the Ready2Go tour seemed right. I’m happy to report, as I’m sure some are wondering, that it nailed the Nilwood turkey tracks perfectly.
I suppose it’s fairly obvious that this is a good fit for someone heading off on all or part of Route 66 for the first time. Then what? As a solo traveler, I basically require voice-in-a-box guidance on a road trip and getting it usually involves plenty of pre-trip plotting. I’m not throwing away any books and I’ll still be plotting routes including some involving Route 66 but there’s a big chunk of that that River Pilot Tours has done for me. Having the big catalog of attractions always at my fingertips is pretty cool, too.
I said I feared that, even after finding the company owner extremely helpful and likable, I wouldn’t like the product. I think my biggest fear was that it would be fragile or that Garmin would mishandle the routing. But Route 66 Attractions with Ready2Go Tours seems to do exactly as it claims and I do like it. Shouldn’t have worried.
UPDATE 05-SEP-2012: I recently completed an end-to-end east-to-west drive of Historic Route 66 using Route 66 Attractions with Ready2Go Tours as my primary guide. I deviated from the suggested route on several occasions but the deviations were to visit some attraction or follow some alignment of which I was aware and not because of a Ready2Go error. As near as I could tell, the suggested route always followed some Route 66 alignment even though it wasn’t always the one I wanted to follow. In many cases, Ready2Go helped me find those off route attractions or other alignments.
As I explained in the original review, the product contains information on lots of Route 66 attractions and can be used to find those attractions even when they are not on the tour route. I was well aware of that but was a little surprised to find that some alternate alignments showed up as well. They did not appear as a route with turn-by-turn directions but the end points appeared as attractions which made finding them easy. Prime examples are the two “sidewalk highway” segments south of Miami, Oklahoma. The segments themselves are perhaps a bit rough to be included in the main tour but all four points where one of them intersects the main tour were marked so they could be located and driven if desired.
My deviations were due to personal preferences that came from previous trips, reading, and talking with other travelers. I’ve little doubt that just following the main line Ready2Go tour would provide a full and satisfying Route 66 adventure for the first-timer and I’ve just proven that it provides a pretty good foundation for the more seasoned roadies (i.e., old farts) among us.
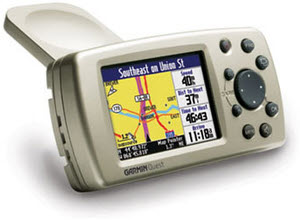 My relationship with GPS receivers took a whole new direction when I got my a Garmin Quest. Some may recall that Garmin described my previous unit, the GPS III Plus, as having “cartographic capabilities”. It did not do routing of any sort. Before buying the Quest in June of 2006, I “test drove” a friend’s GPS V which Garmin called a “versatile navigator”. I believe it was. It did routing and may have served my purpose but it had been discontinued in January and getting current maps for it was already a bit of a problem. That could only get worse. At the end of the day, I opted to spend $345 for a new Quest.

 As we cruised northeast through Edwardsville and Hamel, the voice from the GPS essentially described the actions of the cars in front of me. It allowed me to anticipate turns just a bit so I might have even looked like I knew where I was going. The unit beeped when we approached Sixty-Six attractions such as Weezy’s and Decamp Junction. Each of these was identified and I could have pulled up a description if I’d wanted.
 But the Ready2Go Tour doesn’t just ignore alternate alignments. For one thing, it is built on top of that extensive database of Route 66 attractions and not all those attractions are right along the tour path. At any time a traveler can push “Where To?” to see what attractions are near by. Click
  One alternate alignment actually appears in the product today. The pre-1937 alignment that passed through Santa Fe, New Mexico, can be selected and followed just like the main tour route through the state. In the future, other major alternates, such as the one between Staunton and Springfield, will be added.
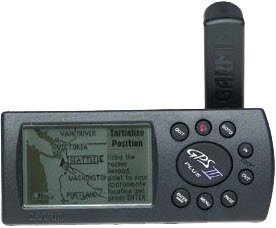 The Garmin GPS III Plus was pretty high-end for a personal GPS in 1999. In July of that year, this baby set me back a whopping $355. Some rather detailed maps could be downloaded to it and it could tell you where things were relative to where you were but it couldn’t tell you how to get there. I’m fairly certain that there was a GPS IV that offered routing but I can find nothing online about it. Today’s web claims that the earliest GPS of this style that did routing was the GPS V. The GPS V was described as a “versatile navigator”. The III Plus merely had “cartographic capabilities”. I always thought of it as an automatically scrolling map.